This homegirl has gone home-based.

Image result for work from home

Yes, after more than 14 years (no hiatus) of working office-based I finally took a leap of faith to do home-based work.

Though technically I have been teaching part-time online English classes from home for 5 years now, I still had my full time job in the BPO which was in a regular office set-up. I was doing online teaching as a passion.

I started with my home-based work journey in the middle of January 2018. I was encouraged with this decision because I have people in my close circle who do home-based work for a long time already. My sister is doing full time home-based online teaching, my cousin-in-law who does virtual assistant/data entry/customer support also home-based, and friends who do it part-time. At first, I made my online teaching full-time. But I was fortunate to get a referral from a good friend who is working as an appointment setter. The job was via Upwork (formerly known as oDesk). I went through 2 interviews before I got hired. Then took a 2 week training – all via online.

All I needed to make it possible was a well functioning laptop (thanks to my DH who gave it to me as a wedding anniversary gift), Upwork account, stable internet and headset. I just make my make-shift office space anywhere at home. Wherever I feel like working for that time/day (hahaha).

So let me give you my opinion so far of working from home.

PROS:

1. No more painful daily and expensive commute to the office and going home. Road traffic is relative to the time of day.

2. You can start working as soon as you wake up. Of course there is the part where you need to boot your laptop, set up your tools, etc but you get what I mean, right?

3. The once travel time is now extra time. Extra time to do other activities that I’d be too tired to do when I get home from work before – cooking, chores, blogging (you might have noticed the last timestamp of my last blog entry), wifey duties, hobbies time, etc.

4. Less laundry to do, cost saving on laundry cost. You can work even in your pajamas (hahaha #truestory, refer to # 2). But of course this is possible if your work does not require you to open your webcam and have video calls. If that’s the case, you can just put on your blazer on top of your pajama (hahaha #truestory).

There are too many PROS, promise. I will just edit and add more here next time, okay?

Okay, for the CONS:

1. Food is way too accessible. The fridge and the pantry are within a few steps and within reach. I keep stuffing food to my mouth. So I stock on fruits and veggies so I have healthy food to snack on. But you know there are really times when you are weak to temptation (sorry naaa).

2. I get sleepy often. So I nap for 30 minutes to an hour in the day.

3. Butt pain because of my make shift office chair. I need to use a pillow to sit on next time.

4. I am now lazy to go out. Just thinking of the traffic and the commute makes me tired already. So when I have chores where I need to go out, I am sooo tamad.

Overall I am enjoying so far my home-based work journey. For those who are thinking of doing it but are a bit scared of the unknown, message me or comment below. Or you can just comment on whatever about this post. If you need help or want some tips, let me know in the comments section, too.

Japan Pack-Off!

Hello again! Now for this entry, I will talk about what I bought and packed for our Japan trip.

It is always a good idea to create a packing list, so you know what to prepare and won’t forget anything. A neat trick I learned if you don’t want to cram-pack on the last day before the trip is to have your suitcase ready and just dump 1-2 items in it each day.

# 1 thing to check at least 2-3 weeks before your trip is the country’s weather. I use AccuWeather whenever I check what the weather will be on our travel dates. This is important since you need to know what items to pack. You wouldn’t want to have the wrong wardrobe for a different season especially for countries that experience the 4 seasons. Since hubby, R wants to travel during winter season it’s automatic that our clothes are for the cold weather. To get wardrobe inspiration or ideas, I suggest using Pinterest since it will show you various internet results of your search keywords.

suitcase

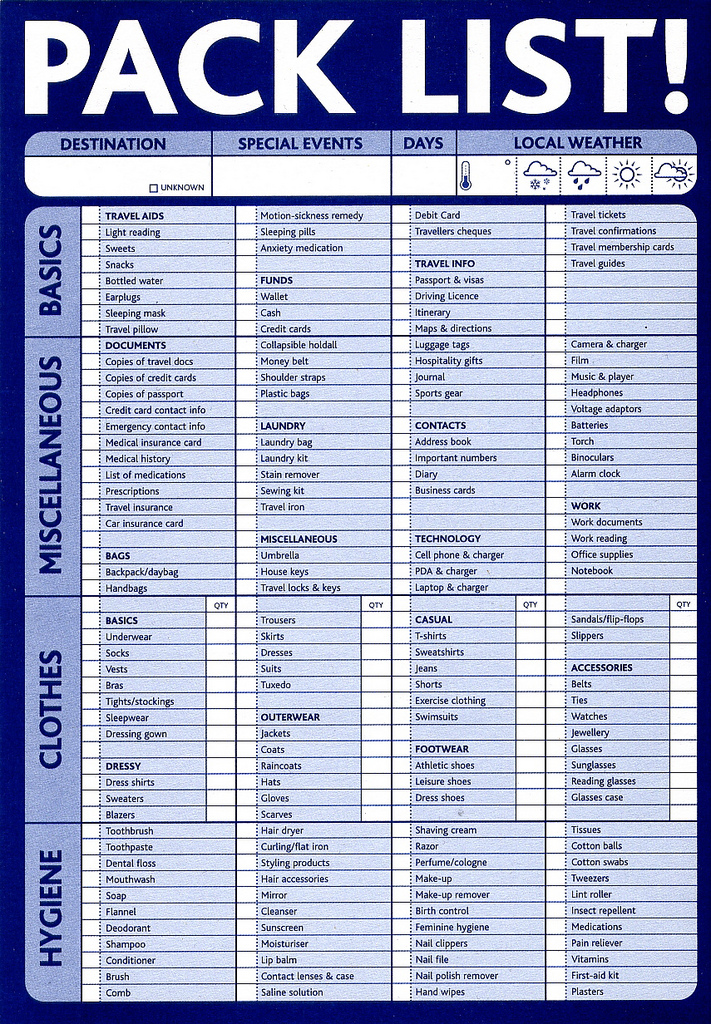
Here’s our packing list:

  1. Basics
    • Travel aids – anything that you might need for the long wait or long trip (reading materials, gadgets, snacks, gum, etc).
    • Funds – the type of financial funding you will need for your trip (cash, credit/debit cards, manager’s check, etc).
    • Travel info – all necessary documents you need for your travel (passport, visa, plane tickets, other valid ids, itinerary, hotel reservations, etc)
  2. Miscellaneous
    • Documents – copies of travel docs, etc
    • Bags – back pack, hand bag, etc
    • Laundry needs – laundry bag, sewing kit, etc
    • Miscellaneous – umbrella, keys, etc
    • Contacts – impt contact numbers, etc
    • Technology – mobile phone, power banks, laptop, etc
    • Work – work documents, anything related to your work, etc
  3. Clothes
    • Basics – undergarment, sleepwear, etc
    • Dressy – pants, sweaters, skirts, etc
    • Outerwear – jackets, coats, etc
    • Casual – shirts, jeans, shorts, ect
    • Footwear – athletic shoes, leisure shoes, etc
    • Accessories – belts, watches, jewelry, etc
  4. Hygiene
    • Facial
    • Hair
    • Body
    • Medicine/First-aid Kit
    • packinglisttemplate

I used to travel with just hand carry baggage since I didn’t like waiting for my luggage at the baggage claim area. It was a good way to get ahead of the taxi queue. Since we travel most of the time to cold places, additional luggage space is needed for your bulky warm clothing. Given that it’s bulky it gets burdensome to carry them too, thus I started to buy prepaid baggage space. Usually suitcases are just thrown in the baggage area of the plane (even with the Fragile sticker on it!), I suggest to get suitcases that are not made of plastic so it won’t break due to the impact of being thrown around.

That’s it for now. Happy packing! 🙂

Buy Your JR (Japan) Train Pass

Are you planning to buy your JR Train Pass? Buy your JR Pass before you travel to Japan to get it at a cheaper price. Whether you will get a regional pass or the all Japan pass, this entry will give you an idea on how to do it.

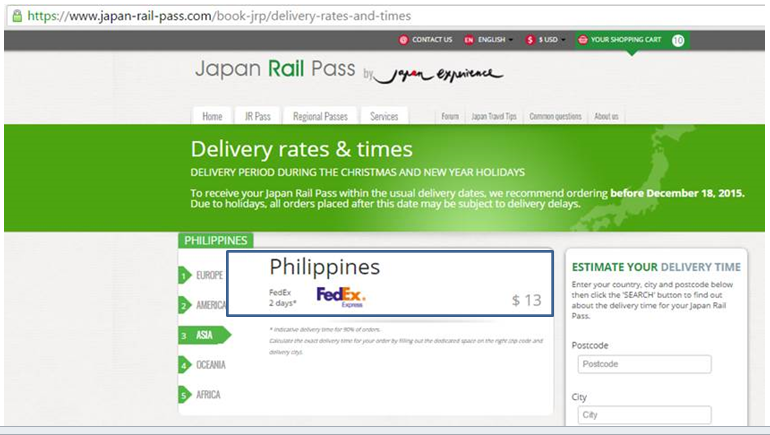
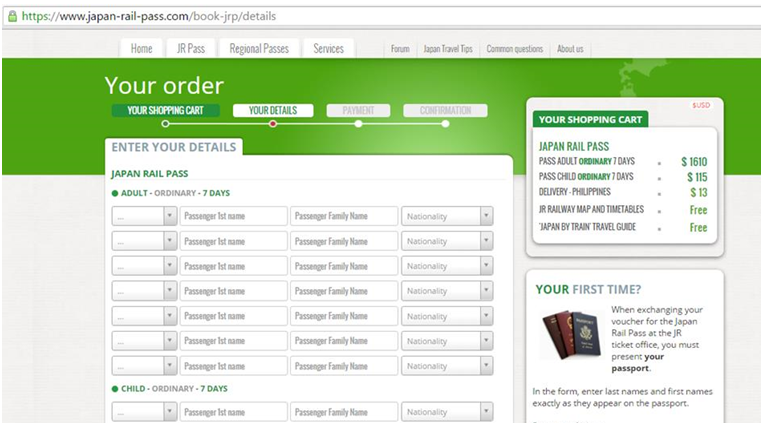
Below is the estimated delivery time once you buy your pass online. Make sure to choose the country where it will be delivered. It will be delivered via FedEx.:

JR Rail 1.PNG

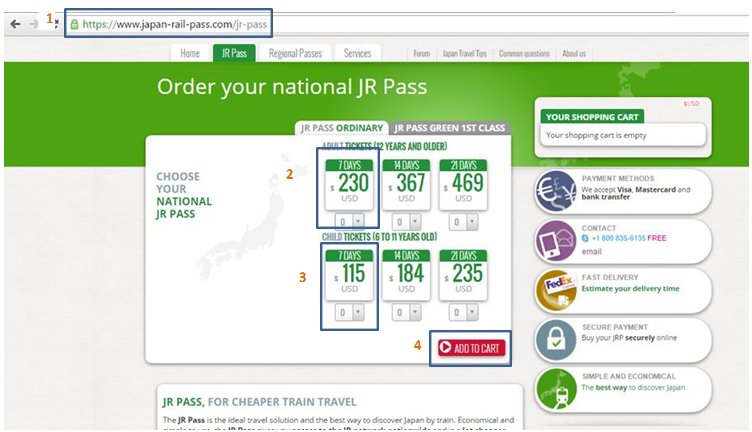
Follow each step number as indicated in the screenshots.:

JR Rail 2.PNG

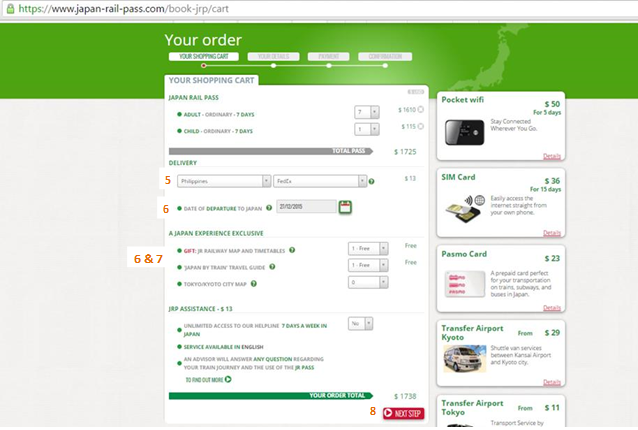
Once you click on “ADD TO CART”, you will be brought to this page below. Update the ones indicated with steps number:

JR Rail 3.PNG

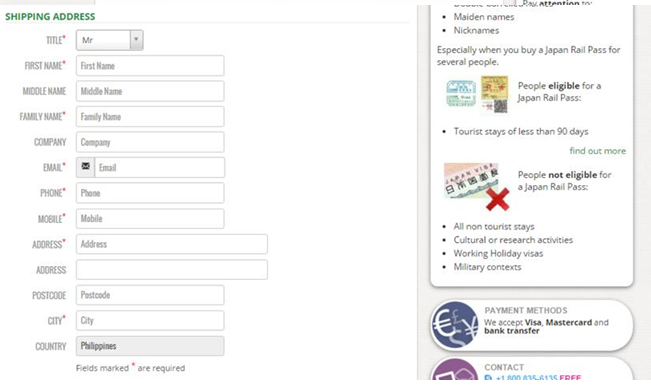
Fill out the next page:

JR Rail 4.PNG

JR Rail 5.PNG

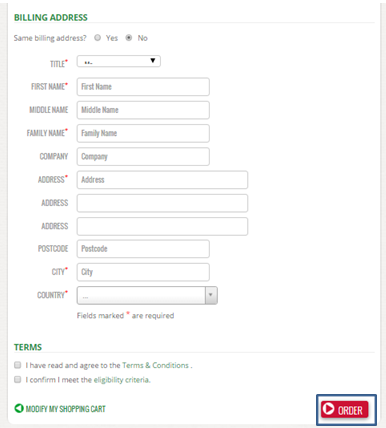
And finally, fill out the billing address and click “ORDER”:

JR Rail 6.PNG

You will receive an order confirmation with the FedEx tracking information in your email. In a few hours you will also receive an email from FedEx updating you on your shipment. I got my JR Pass invoice after 2 days from when I bought it online. Make sure to bring the invoice with you when you travel. You need to bring it to the JR office once you arrive at your Japan airport destination. From there, they will print out and hand you your JR Pass. Take note of the dates when you plan to start using it.

Enjoy your trip! 🙂


Got the JP Visa, Now What?

From my last blog entry, I gave an insight on what I went through to get our Japan visa. One thing to note is you are not required by the Japan embassy to reserve and pay for your accommodation and plane tickets. So it’s at your risk if you don’t get approved for a visa and you’ve done all the purchase ahead of time. You just need to provide estimates on your trip dates and where you will stay.

Now that we have our visa, the next thing to prepare is the transportation arrangement, trip itinerary, and accommodation.

Japan is a country with different regions – north, east, west and south regions. Since we only have 8 days and how my hubby, R likes his vacation to be a relaxing one I knew it would be impossible to see all regions. Anyway, going to the other regions we haven’t seen yet is a good excuse to go back to Japan. 🙂  I initially wanted to go Hokkaido because I wanted to be where there’s a lot of snow, but opted with Kansai region as there are more famous places to see there. It would be a good first Japan experience for both of us.

20151122_114104[1]

I read in a blog that you can get a train pass for a certain region, or even for all of Japan which you can use for 1, 2, 3, 7 or 14 days. You can choose from several options from different train lines. I chose the Japan Rail Pass since JR is the biggest and widest railway network in Japan. Use this website to see what they can offer:

https://www.japan-rail-pass.com/jr-pass

It took me quite some time to decide on what train pass to buy since I wanted to go to all the major attractions in Japan in 8 days, but knowing R he will have a hard time with a jam-packed itinerary and our budget will also shoot up. I read another blog to get more tips on what would be the best option to choose. I eventually bought the JR Kansai Area for 3 days consecutive use ($99 for 2 including Fedex delivery of the invoice), as well as the one-way ICOCA and Haruka pass (3,030 yen).

After finalizing the train passes, then I started to create our trip itinerary. It’s another blog entry though, so click here to read it.


As for accommodation: Since I have started to use Airbnb to host our condo unit for rent (Let us host your next Manila trip! Click here >> Link 1 , Link 2 ), I booked via Airbnb our accommodations in Osaka and Kyoto.  We were able to save a lot as well as enjoyed our stay in our 3 accommodations. I highly suggest for those who are budget conscious, to check out options in Airbnb for your next trip. You even have the option to choose for places to stay in that offers a pocket wifi, which in my opinion is a must-have when you are traveling in a foreign country to help you look up information/location via the internet. Below are links to our accommodations:

1: https://www.airbnb.com/rooms/4360676

2: https://www.airbnb.com/rooms/5937367

3: https://www.airbnb.com/rooms/9175972

That’s it for this one. See you on my next entry! 🙂

20151122_104719[1]


Kansai, Japan Itinerary (6 Days)

20151122_113920[1]

Here are the details of the trip itinerary that I created for our Kansai, Japan trip. It may seem extensive but I like putting in as much information I can get.

Travel dates: Nov. 21 – 28, 2015

Temperature ranges: 5 – 15 degree Celcius

Day 1 (Nov 21): MNL to KIX

Day 2 (Nov 22):

Nara

  • What to see:
  • Todaiji Temple

Get There and Around

Todaiji is located in the northern part of Nara Park. It is about a 30 minute walk from Kintetsu Nara Station, or about a 45 minute walk from JR Nara Station. It can also be reached by bus from either station. Get off at Todaiji Daibutsuden from where it is a 5-10 minute walk to Todaiji’s main building.

Hours and Fees

Daibutsuden Hall

Hours 8:00 to 16:30 (November to February)

8:00 to 17:00 (March)

7:30 to 17:30 (April to September)

7:30 to 17:00 (October)

Closed No closing days

Fees 500 yen

Todaiji Museum

Hours 9:30 to closing time of Daibutsuden Hall (admission ends 30 minutes before closing)

Closed Between exhibitions

Fees 500 yen (museum only), 800 yen (museum and Daibutsuden Hall)

  •  Horyuji Temple

Get There and Around

Horyuji is located about 12 kilometers outside of central Nara.

Other places to see:

  1. Omizutori
  2. Isuien Garden
  3. Nara Park
  4. Kasuga Taisha
  5. Toshadaiji Temple
  6. Wakakusa Yamayaki
  7. Yakushiji Temple
  8. Shin-Yakushiji
  9. Heijo Palace
  10. National Museum
  11. Kofukuji Temple
  12. Yoshikien Garden
  13. Naramachi
  14. Wakakusayama

20151122_114516[1]

 How to travel between Nara and Kyoto:

Two railway companies, JR and Kintetsu, provide train connections between Kyoto and Nara:

By Japan Railways (JR)

Direct, 45 minutes, 710 yen one way, two connections per hour.

Miyakoji rapid trains operate every 30 minutes between Kyoto Station and JR Nara Station. The one way trip takes 45 minutes, costs 710 yen and is covered by the Japan Rail Pass. For the same fare, the trip could also be made by twice-hourly local trains in 75 minutes.

By Kintetsu Railways

0-1 transfers, 35-45 minutes, 620-1130 yen one way, multiple connections per hour.

Twice-hourly limited express trains take about 35 minutes and cost 1130 yen for the one way trip from Kyoto Station to Kintetsu Nara Station. Alternatively, there are hourly direct express trains that take 45 minutes and cost 620 yen one way. There are additional connections by express trains if you do not mind transferring once at Yamato-Saidaiji Station. The Japan Rail Pass is not valid on Kintetsu trains.

Above fees and schedules are subject to change. For the current yen exchange rate, click here. 

  • Nanzenin Templehttp://www.japan-guide.com/e/e3905.html
    • Nanzenji’s central temple grounds are open to the public free of charge, but separate fees apply for entering temple buildings and subtemples.
  • Konchi-in Temple
  • Tenjuan Temple

Get There and Around

Nanzenji is a 5-10 minute walk from the nearest subway station, Keage Station on the Tozai Line (about 20 minutes, 260 yen from Kyoto Station by subway via Karasuma-Oike Station), or a 5-10 minute walk from the nearest bus stop, Nanzenji-Eikando-michi bus stop (35 minutes, 230 yen from Kyoto Station by Kyoto City Bus number 5).

Nanzenji is also located only a short walk from the southern end of the Philosopher’s Path, while Ginkakuji Temple is at the northern end.

Hours and Fees

  • Sanmon Gate

Hours 8:40 to 17:00 (until 16:30 from December to February)

Admission ends 20 minutes before closing time.

Closed December 28 to 31

Fees 500 yen

  • Hojo

Hours 8:40 to 17:00 (until 16:30 from December to February)

Admission ends 20 minutes before closing time.

Closed December 28 to 31

Fees 500 yen

  • Nanzenin

Hours 8:40 to 17:00 (until 16:30 from December to February)

Admission ends 20 minutes before closing time.

Closed December 28 to 31

Fees 300 yen

  • Konchi-in Temple

Hours 8:30 to 17:00 (entry until 16:30 from December to February)

Closed No closing days

Fees 400 yen

  • Tenjuan Temple

Hours 9:00 to 17:00 (until 16:30 during winter)

Special evening hours during the autumn illumination

November 11 and 12 have limited opening hours

Closed No closing days

Fees 400 yen (500 yen during the evening illumination)

20151122_140505[1]

Day 3 (Nov 23) KYOTO:

Tofukuji Templehttp://www.japan-guide.com/e/e3930.html

Get There and Around

Tofukuji is a ten minute walk from Tofukuji Station on the JR Nara Line (2 minutes, 140 yen from Kyoto Station) and the Keihan Main Line. Alternatively, the temple is a ten minute walk from Tofukuji bus stop (15 minutes, 230 yen from Kyoto Station by Kyoto City Bus 208).

Hours and Fees

Hours 9:00 to 16:30 (April to October)

8:30 to 16:30 (November to early December)

9:00 to 16:00 (early December to March)

Admission ends 30 minutes before closing time.

Closed No closing days

Fees 400 yen (Tsutenkyo Bridge and Kaisando Hall), 400 yen (Hojo and gardens)

Fushimi Inari Shrinehttp://www.japan-guide.com/e/e3915.html

Get There and Around

Fushimi Inari Shrine is located just outside JR Inari Station, the second station from Kyoto Station along the JR Nara Line (5 minutes, 140 yen one way from Kyoto Station, not served by rapid trains). The shrine can also be reached in a short walk from Fushimi Inari Station along the Keihan Main Line.

Hours and Fees

Hours Always open

Closed No closing days

Fees Free

Southern Higashiyama

Kiyomizudera Temple – http://www.japan-guide.com/e/e3901.html

 Get There and Around

Kiyomizudera can be reached from Kyoto Station by bus number 100 or 206 (15 minutes, 230 yen). Get off at Gojo-zaka or Kiyomizu-michi bus stop, from where it is a ten minute uphill walk to the temple. Alternatively, Kiyomizudera is about a 20 minute walk from Kiyomizu-Gojo Station along the Keihan Railway Line.

Hours and Fees

Kiyomizudera Temple

Hours 6:00 to 18:00

Closed No closing days

Fees 300 yen

Spring and Fall Illumination

Hours 18:30 to 21:30 (mid March to mid April and mid November to early December)

Fees 400 yen

Kiyomizudera (1 hour)

Start at Kiyomizudera Temple. Go early in the day, if possible, as it tends to be less crowded in the mornings.

  • Higashiyama District (1 hour) – Upon exiting Kiyomizudera, walk down the temple approach while exploring the shops along the way. Turn right just before the fork in the road and head down the Sannenzaka stairs onto the somewhat quieter shopping streets below. Continue past the Ninenzaka steps to reach Kodaiji.
  • Kodaiji (45 minutes) – Explore Kodaiji and surroundings.

Hours: 9:00 to 17:30

Closed: No closing days

Fee: 600 yen

Kodaiji Temple was constructed in 1605 in memory of Toyotomi Hideyoshi by the great political leader’s wife. It features temple halls, gravel and landscape gardens, teahouses and a bamboo grove.

  • Yasaka Pagoda

Hours: 10:00 to 16:00

Closed: No closing days

Fee: 400 yen

Yasaka Pagoda, the last remnant of Hokanji Temple, is one of the most visible and recognizable landmarks in the Higashiyama District. Visitors may climb up the inside of the five story pagoda, which is a rare opportunity as most pagoda can only be viewed from the outside.

  • Yasaka Shrine (more details)

Hours: Always open

Closed: No closing days

Fee: Free

Yasaka Shrine, host to the Gion Matsuri, is one of Kyoto’s most popular shrines and is located at the eastern end of Shijo-dori next to Maruyama Park. The shrine’s hanging lanterns are lit every night after dark.

  • Maruyama Park (more details)

Hours: Always open

Closed: No closing days

Fee: Free

Maruyama Park is a public park next to Yasaka Shrine. During the first half of April, when the cherry trees are in full bloom, Maruyama Park becomes Kyoto’s most popular and most crowded spot for cherry blossom viewing.

20151122_140655[1].jpg

Day 4 – 6 (Nov 24 – 26) OSAKA : Universal Studios Japan (1st option) – http://www.japan-guide.com/e/e4021.html

 Get There and Around

By train

The entrance gate of the Universal Studios Japan is located a five minute walk from Universal City Station on the JR Yumesaki Line (also referred to as JR Sakurajima Line). From Osaka Station, there are several direct trains per hour (15 minutes, 180 yen) and many more connections that require an easy transfer at Nishikujo Station. From Kansai Airport, take a JR airport rapid to Nishikujo Station and transfer to the JR Yumesaki Line to Universal City Station (75 minutes, 1190 yen).

By bus

Universal Studios Japan is connected by bus to Kansai Airport (35-75 minutes, 1550 yen, about 1 bus/hour) and Itami Airport (45 minutes, 930 yen, about 1 bus/hour). Some overnight buses from other cities across Japan also stop at the Universal Studios Japan.

By ferry

A ferry service named “Captain Line” connects the Universal Studios Japan with the Osaka Aquarium (10 minutes, 700 yen one way, 1300 yen roundtrip, 1-2 ferries per hour). A combination ticket for the aquarium and the ferry ride can be purchased for 2700 yen (one way) or 3300 yen (roundtrip).

Hours and Fees

Hours:    Varying hours, typically from 10:00 to 18:00 during low season and from 9:00 to 21:00 during peak season. Please refer to the park’s official website.

Closed:   No closing days

Admission:            6,980 yen (12-64 years old)

4,880 yen (4-11 years old)

6,270 yen (65 years or older)

Passes include unlimited rides and can be bought at the gate or at JR ticket counters, Lawson convenience stores, selected travel agencies and partner hotels.

Express Passes, that allow holders to skip lines for selected rides, are available for four rides (3,290 yen) or seven rides (5,040 yen) on the day of the visit at the entrance gate and inside the park. Express Passes may sell out on busy days.

Day 4 – 6 (Nov 24 – 26) OSAKA :

Minami (Namba) – http://www.japan-guide.com/e/e4001.html

 Get There and Around

The Minami area is centered around Namba Station and the Osaka City Air Terminal (OCAT) and is served by multiple train and subway routes as well as buses.

Namba Station is not a single station, but rather a collection of multiple station buildings and platforms, including Nankai Namba Station, JR Namba Station and Kintetsu’s Osaka Namba Station. Furthermore, the Midosuji, Yotsubashi and Sennichimae Subway Lines stop at their respective Namba Stations.

Most airport and highway buses serve the Osaka City Air Terminal (OCAT), which is located in the same building as JR Namba Station.

From Shin-Osaka and Osaka Stations:

The Midosuji Subway line connects Shin-Osaka and Osaka/Umeda Stations directly to Namba Station. It takes approximately 8 minutes and 240 yen from Osaka/Umeda Station and 15 minutes and 280 yen from Shin-Osaka Station.

From Kansai Airport:

By train:

Nankai Railways operates direct trains between Kansai Airport and Nankai Namba Station. Express trains take around 45 minutes and cost 920 yen (non-reserved seats only), while limited express trains (“Rap:t”) take around 35 minutes and cost 1430 yen (reserved seats only).

It is also possible to travel by JR, but it requires a transfer at Tennoji Station along the way. The whole trip takes approximately one hour and costs 1060 yen, using the JR Airport Rapid.

By bus:

Buses run from Kansai Airport to the Osaka City Air Terminal (OCAT) approximately every 30 minutes. Tickets can be purchased at the airport limousine bus counter and cost 1000 yen. Travel time is about 50 minutes.

20151122_140705[1]

Osaka Castle (Osakajo) – http://www.japan-guide.com/e/e4000.html

 Get There and Around

 The recommended approach to Osaka Castle is through Otemon Gate at the park’s southwestern corner. The closest station is Tanimachi 4-chrome Station along the Tanimachi Subway Line and Chuo Subway Line.

The closest JR station to Osaka Castle is Osakajokoen Station on the JR Loop Line, a 10 minute, 160 yen ride from JR Osaka Station.

Hours and Fees

Castle Tower

Hours 9:00 to 17:00 (entrance until 16:30)

Extended hours during various holidays and special exhibitions

Closed December 28 to January 1

Fees 600 yen

Nishinomaru Garden

Hours 9:00 to 17:00 (until 16:30 from November through February)

Open until 20:00 during the cherry blossom season.

Closed Mondays (or following day if Monday is a national holiday), New Year holidays

Fees 200 yen (500 yen during the extended hours of the cherry blossom season)

Sumiyoshi Taisha – http://www.japan-guide.com/e/e4007.html

Get There and Around 

Sumiyoshi Taisha is located in southern Osaka, a few steps from Sumiyoshi Taisha Station on the Nankai Main Line. From Nankai Namba Station, the one way ride costs 210 yen and takes less than ten minutes by local trains. Note that faster train categories do not stop at Sumiyoshi Taisha Station.

Sumiyoshi Taisha can also be reached by the Hankai Tramway from Tennoji. Alight at Sumiyoshitoriimae or Sumiyoshikoen Station (15 minutes, 210 yen one way from Tennojiekimae), which are a few steps from the shrine.

Hours and Fees

Hours 6:00 to 17:00 (from 6:30 from October through March)

Closed No closing days

Fees Free

Shitennoji Temple – http://www.japan-guide.com/e/e4011.html

 Get There and Around

 Shitennoji is a short walk from Shitennoji-mae-Yuhigaoka Station on the Tanimachi Subway Line. Alternatively, it can be reached in a ten minute walk north of JR Tennoji Station on the JR Loop Line.

Hours and Fees

The outer temple grounds are free to enter, but admission to the inner precinct, the Gokuraku-jodo Garden and the treasure house is paid. In the pebble covered courtyard of the inner precinct stand a five-storied pagoda that can be entered and ascended and the Main Hall (Kondo) in which Prince Shotoku is enshrined as a statue of Kannon.

Inner precinct

Hours 8:30 to 16:30 (until 16:00 from October through March)

Closed No closing days

Fees 300 yen

Gokuraku-jodo Garden

Hours 8:30 to 16:30 (until 16:00 from October through March)

Admission ends 30 minutes before closing time.

Closed Frequent closures, particularly during the first ten days of many months.

Fees 300 yen

Treasure House

Hours 8:30 to 16:30 (until 16:00 from October through March)

Closed Long closures between exhibitions

Fees 500 yen

Our Japan Amazing Race

20151122_121549

We just came back from our 8 days “Amazing Race: Couples edition” version trip to Japan. Our trip was from Nov. 21-28. I thought of blogging about the whole 9 yards, so I can give back to our blogging community as well as to help DIY travelers like me who rely and get helpful tips from travel blogs, too.I will divide them in portions though, lest I want to bore you with a lengthy read.

1st part: The JP Preparation (plane tickets, documents gathered, visa application)
2nd part: Got the JP Visa, Now What? (Accomodations, itinerary)
3rd part: JP Pack-Off! (Stuff bought, packed)
4th part: JP: Ready, Jet-set, GO! (Day 1-2)
5th part: JP: Ready, Jet-set, GO! (Day 3-4)
6th part: JP: Ready, Jet-set, GO! (Day 4-5)
7th part: JP: Ready, Jet-set, GO! (Day 6-8)

Enjoy! 🙂

img1448160727752[1]

img1448166116394[1]

The JP Preparation

20151125_112858
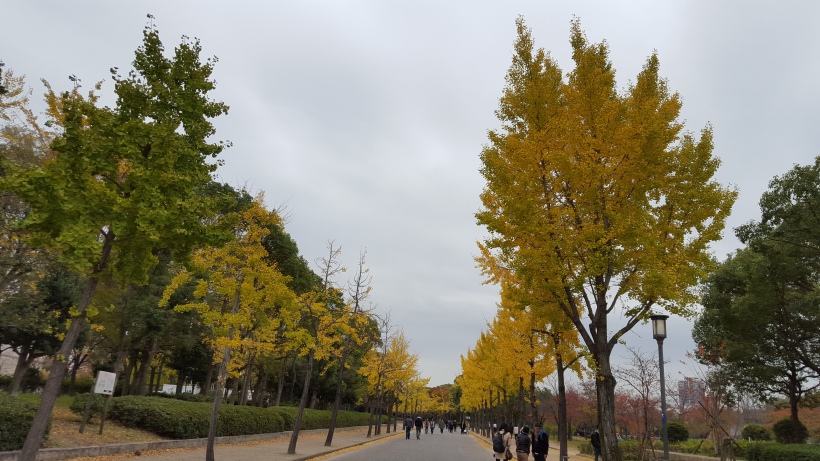
Beautiful autumn colors at the path leading to Osaka Castle.

One part of traveling that can be cumbersome for others is the preparation. This post will take you through the whole ordeal (but so worth it!) I took for our Japan trip.

I’m from a travel-crazy family, so guess who loves to travel. I’ve been fortunate to have gone to places some people have not seen yet or still dream of seeing. I plan to  blog about those past trips, but for now let’s focus on our Japan adventure.

Plane tickets. This is best bought in advance and during seat sales. I am always on the look out for these. Make Cebu Pacific, Air Asia and all the low cost airline websites part of your browser’s bookmarks. These will be your bestfriends and will be the start of your budget travel. I used to be really cost conscious that i don’t purchase seat reservations and baggage allowance but since seeing benefits from getting it (being able to choose your seat, no longer hoping to get a window instead an aisle seat, and not worrying about going over the limit of 7 kilos for hand-carry), I avail them every time I book. I bought our Manila-Kansai, Japan – Manila tickets from Cebu Pacific online last June 2015 and was worth Php 10,933 for 2 persons. What is good in this day and age, you can purchase plane tickets online and even use different payment options aside from a credit card. I availed of the reserved seats with my usual seat numbers, and got the 20 kilos baggage allowance. Tip: when traveling during winter season of your destination, choose a bigger baggage allowance. Since your jackets, coats and other winter items will eat up most of your luggage space. After booking the tickets, I took note of the travel details in my Evernote on my mobile phone for easy access when you start looking for accomodation, etc.

Japan visa application. Now this is the part when it starts to be challenging. I think it was around August or September when I began working on the requirements needed. When I am about to go somewhere, may it be with a visa or none, local or international I check out blogs to get tips on creating itineraries, budgets, and visa application. I don’t have a particular blog I frequent but just keep searching and reading entries and get what’s useful for me. I bookmark them for future reference. It is important to still always check the embassy’s site for the latest list of requirements and any updates on the process. Here is the official website of the Embassy of Japan in the Philippines and the list of requirments for tourist visa application:

http://www.ph.emb-japan.go.jp/visiting/new%20visa/tourism.htm

img1448166116394[1]

I have heard of horror stories before on how hard it is to get approved for a visa to Japan, how there’s a lot of requirements to submit, how you need to have a big amount in your bank account for “show money”, etc. Which in my opinion makes others have second thoughts in trying to apply. At first it got me worried, but when I clicked on the Submit Payment button in Cebpac I knew I have to brave the storm. Win or lose. Manalo matalo. The embassy doesn’t accept walk-in application. Thought the visa fee for tourists is Gratis (Free), you have to get it processed for you by their accredited travel agencies. They have a list of these in their website, too. I chose 1 of the top 3 and chose the one located near our office so it would be easier to go there after our graveyard shift. I picked Reli Tours (Hello and thank you, Reli Tours!) in Dusit Thani Hotel, Makati City. This is their main office, that in some sense assured me that I am in good hands (Call me weird, I know). I checked their website and saw their procesing fee of Php 950 for each Japan tourist visa, which made my stingy self cringe a bit. Forgive me, but this happens most of the time with me since I know I could have saved that amount if I were to process it myself. Anyway that’s the rule, so I do as what they say.  I called them when I had questions and they were helpful enough.

I started requesting for the usual documents, I won’t get into the detail for each but will focus on 1 requirement that really gave me a hard time. My late registered birth certificate (cue Twilight Zone music). Though it was an NSO (now PSA) copy already, I needed to provide additional supporting documents: certified true copy of Baptismal certificate and school record (form 137). These documents must be issued from the last 3 months for it to be valid. I asked the travel agent I spoke to why it has to be a high school record, not a college school record. But rules are rules. You see since I got married I live in Cainta and my high school is in Multinational Village, Parañaque City. So I stayed overnight at my sister’s place in the south and first thing in the morning went to my high school to get my school record. Good thing my school is so organized that it just took them less than 30 minutes to find my record and provide me with certified true copies for 4 pesos each page. Then I figured out how I will get my baptismal certificate. Enter challenge # 2. I was born in Lucena City, Quezon Province which was 3-4 hours travel by car. I was baptized in Candelaria, Quezon Province which was the city before Lucena. So at least 2.5-3 hours travel from Manila. I asked my dad who works in Batangas if he could go there for me but it was out of the way for him. So I planned on taking a bus after shift Saturday morning going there. After my dad heard my plans and since I am the favorite child, he has convinced my brother to drive for me instead on the same day. So yay! All I have to worry of is paying gas and toll fees. This is by the way on a work week, so I have work in the evening. So we took off around 9am, I slept almost the whole trip to catch on sleep for the shift in the evening. My brother drove fast and took the diversion which avoided the city propers making it a quicker trip. We got there around 1130am which was a relief since I was afraid that we might get their on their lunch break. I didn’t want to lose more time than we were supposed to. I paid for Php 100 for 1 true copy of my baptismal record. Soon as I got it, we travelled back already. We arrived in Parañaque around 2pm and I stil had to travel going to Cainta. So you could just imagine how I was feeling at work in the evening. Anyway, I am just so happy that I got that accomplished.

20151122_140340[1]

We then went to Reli Tours after completing all requirements, submitted them and got our pick-up slip with the date for the week after. Please note that if you are submitting docs for someone else, make sure to bring an authorization letter to authorize you to submit on his behalf.

Prayers help a lot so on the day of pick-up I was just so happy to see that we were approved for a visa! Yay! Japan! Japan!


Day 3, 4 and 5 Meals

I’ve shared so far the Tuesday and Wednesday meals I’ve prepared this week. I’ve challenged myself to cook daily even after work. I was successful! 🙂

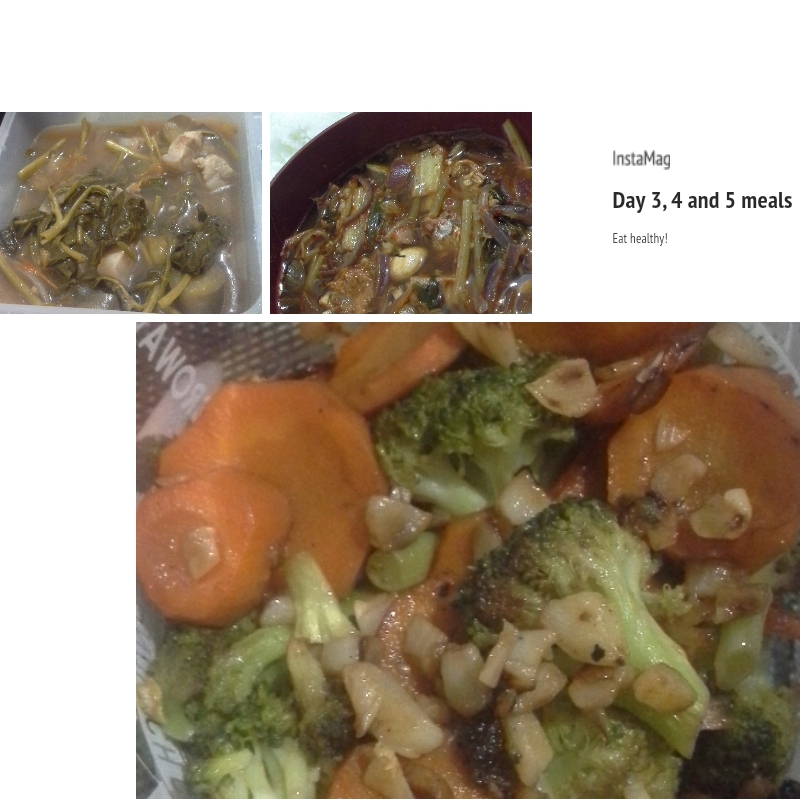
Here are other dishes I cooked over the last 3 days. These are easy and quick-to-cook food that even the busiest person can manage to do. I add vegetables to what I cook and I encourage you to do so too. At this time and age, eating healthy food is very important. The greener, the better!

image
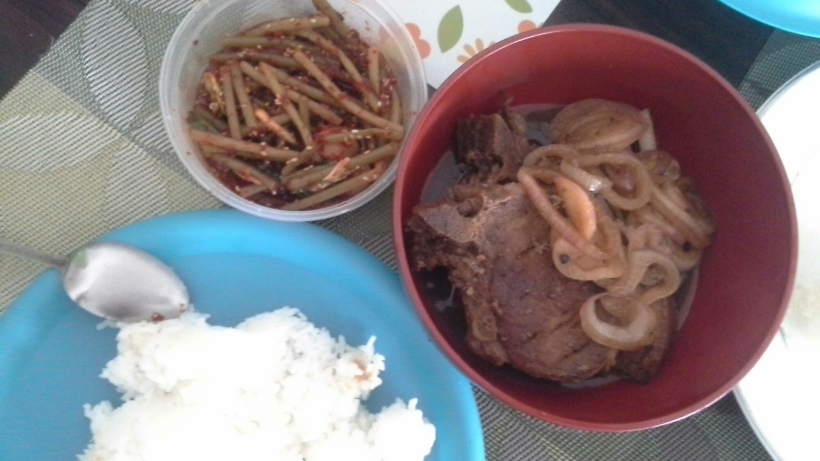
(L-R) Pork sinigang, mackerel kimchi stew and veggie side dish

Pork sinigang
(From Pinoy Food Recipe app)

Ingredients:

2 lbs pork belly (or buto-buto)
1 bunch spinach (or kang-kong)
3 tbsp fish sauce
1 bunch string beans (sitaw), cut in 2 inch length
2 pieces medium sized tomato, quartered
3 pieces chili (or banana pepper)
1 tbsp cooking oil
2 liters water
1 large onion, sliced
2 pieces taro (gabi), quartered
1 pack sinigang mix (good for 2 liters water)
* you may also add okra and eggplant if desired

Cooking Procedure:

1. Heat the pot and put-in the cooking oil
2. Saute the onion until layers separate
3. Add the pork belly and cook until outer part turns light brown
4. Put-in the fish sauce and mix with the ingredients
5. Pour the water and bring to a boil
6. Add the taro and tomatoes then simmer for 40 minutes or until pork is tender
7. Put-in the sinigang mix and chili
8. Add the string beans (and other vegetables if there are any) and simmer for 5 to 8 minutes
9. Put-in the spinach, turn off the heat, and cover the pot. Let the spinach cook using the remaining heat in the pot.
10. Serve hot.

Mackerel kimchi stew
(From http://www.beyondkimchee.com/mackerel-pike-kimchi-stew/)

Ingredients

1 can of Mackerel Pike, reserve 1/4 cup of juice and drain the rest
2 cups diced kimchi
1 teaspoon sugar, optional
1 tablespoon grape seed or canola oil
1 onion, sliced
1 clove garlic, minced
1 teaspoon minced ginger
1-1/2 tablespoon Korean chili flakes
1-2 tablespoon Korean say sauce for soup
3 tablespoon kimchi juice
1-1/2 cup water, or more
1 of each green and red chilies, sliced, optional
1 green onion, chopped for ganish
Directions

In a small bowl, combine 1/4 cup of canned mackerel juice with garlic, ginger, Korean chili flakes, and soy sauce. Add the kimchi juice and combine well. Set aside.
Heat grape seed oil in a shallow pot over medium heat and fry kimchi for 5 minutes until they get somewhat soft. (Add 1 teaspoon sugar if your kimchi is too sour)
Add canned fish and onion to the pot and drizzle the chili garlic sauce over. Pour water to barely over everything. You might nee a little more.
Bring to boil and cover, reduce the heat to low and simmer for 15-20 minutes. Taste the stew and season more with soy sauce if you need.
Add the chilies, if using, and cook for 1-2 more minutes. Garnish with green onion. Serve hot with rice.

Roasted Broccoli with Garlic
(From http://www.kalynskitchen.com/2006/02/weekend-herb-blogging-21-garlicroasted.html)
(Makes about 4 servings, recipe adapted from The Food Network.)

Ingredients:
1 bunch broccoli, about 1 1/2 pounds, cut into bite sized flowerets
2 carrots
3 T extra virgin olive oil
6-8 cloves fresh garlic (or more, I used about 12 cloves)
salt and fresh ground black pepper to taste

Instructions:
Cut broccoli into bite sized pieces, and peel and slice stems if large. Slice garlic cloves, and cut slices in half if you want thinner pieces of garlic. (I don’t usually do that any more.)

Toss broccoli with olive oil, garlic, salt, and pepper, then roast in medium heat. Roast until broccoli is bright green and edges are starting to brown slightly, 20-25 minutes. Serve hot.

Enjoy eating healthy! 🙂

Newbie Cook!

I’ve been practicing my cooking for some time now. Since both my hubby and I work at night and spend more than 9 hours in the office, I become too tired to cook. Unfortunately, we end up ordering from the cafe in our village or worse order fast-food. I worry about the nutrients or lack of it from the food we eat and vowed to try my best to cook food. Hubby is so far happy and pleased with my cooking that one time I got too busy at work to cook, he said that he missed my cooking already. 🙂

I get cooking ideas from Pinterest. I pin recipes I want to try next time. I have tried recipes that I never thought I could do before. From Filipino to Korean dishes! I looked up dishes that can be cooked in a short time, since it’s ideal for someone like me who has little to no time at all.

Ever since hubby said he missed my dishes, I planned on cooking again even on weekdays after work. We went to the grocery last weekend and I bought ingredients for recipes I’ve decided to do this week. I have lined up in my list samgyeopsal, pork steak, sinigang, adobo, friend porkchops and a lot of vegetable side dishes.

Today I am sharing 2 dishes I’ve cooked for the last 2 days. Credits go to the Pinoy Recipes app and Pinterest that helped me cook these wonderful meals! You can make adjustments to the recipe and amount of ingredients you will use to your own liking. 🙂

Samgyeopsal
From: http://unitedkpop.com/2014/06/friday-foods-samgyeopsal/

image

Ingredients:

– 4lbs of pork belly, sliced
– sesame oil
– 6 tbsp soybean paste
– 4 tbsp hot chili paste
– 1 garlic clove, minced
– 1 spring onion, sliced
– a dozen perilla leaves (or lettuce)

Step 1: In a bowl, mix the soybean paste, hot chili paste, garlic, spring onions and 3 tbsp of sesame oil.

Step 2: Add sesame oil to a pan or grill and cook the pork slices, flipping it over to make sure both sides are cooked.

Step 3: Once the pork slices are cooked, place a slice onto a perilla leaf and drizzle the sauce (from step 1) onto the pork.

Step 4: Roll the leaf, and you’re ready to eat! If you don’t like the perilla leaf, then go ahead and use lettuce.

Pork Steak
From: Pinoy Recipe app

image

Ingredients:

4 to 5 pieces pork chops
5 tablespoons soy sauce
2 pieces lime or 1 piece lemon
1/2 cup cooking oil
2 medium onions, sliced
1 1/2 cups water
1 tablespoon granulated white sugar
Salt and pepper to taste

Cooking procedure:

1. Combine pork chops, soy sauce, and lime juice in a large bowl or container. Marinade for at least 1 hour.
2. Heat a pan then pour-in cooking oil.
3. Pan-fry the marinated pork chops in medium heat for 3 to 5 minutes per side.
4. Remove excess oil. Pour-in the remaining marinade and water and let boil. Simmer for 45 minutes or until the pork is tender. Note: Add water as needed.
5. Add-in the sugar, salt, and pepper then stir.
6. Put-in the onions and cook for 3 minutes more.
7. Turn-off heat and transfer to a serving plate.

Finally, Shine Spa!

My hubby and I love getting body massages. We used to frequent a famous spa in Timog, QC but quit going there when their service started to go bad. Aside from that, our favorite therapists left already. We tried giving it another shot but after a few failed attempts and therapists falling asleep during the session, we knew we had to end our relationship with that place.

So after maybe 3 months of no massage, oh poor aching body. With the work that we do, sometimes the stress can be really something. I started to check out spa vouchers from MetroDeal and see what’s out there. Since my hubby can be meticulous and I wanted to find a worth it spa experience, I checked out reviews of each spa from the MetroDeal offers. It took some time to review a lot of spas, but then I read Shine Spa’s review. They have positive reviews and saw even a blog post about them. The review said that they have professional therapists, good and cozy area setup, and the location is within Makati which is quite near our place. I bought 4 vouchers from them with the thought that we would get our massage 2x for almost 2 months. That was the idea, but due to busy schedules we kept postponing until the voucher expiry was only a week away. Since we couldn’t really use all four in just 1 week, I decided to give the other 2 to 2 of my friends from work. I told them it’s my Christmas gift already for them. Nyahaa! I bought another one for our Indian friend since he has been sick for more than a week already and I thought the massage would help make him feel better.

Sessions need to be reserved in advance. I saw in 1 post that you have to call in for reservation 3 days before your desired schedule, but I called in to reserve a day before the session we wanted. I had trouble calling their landline number on Friday night from 9pm to 11pm. They only had 1 contact number which I kept trying several times. I quit it for a couple of hours, and called them again at around 1am. Finally it rang and I was able to connect with their receptionist. I made my reservations for 9pm Saturday (for me and hubby) and 4pm for our foreigner friend.

We used Waze since we weren’t familiar with the location. I called them 15 minutes before our schedule to let them know that we are already on our way. Their spa is located at the ground floor of Alpha Salcedo building in Salcedo Village, Makati. We missed the last turn in the street and went around again. On the 2nd try, we finally took the right turn. A parking space wasn’t too hard to find, we parked right behind Alpha Salcedo building. I asked the building guard where the Shine Spa is, and we were told to go inside the building, go straight and out the front door and turn right.

We got there around 915pm. Soon as we entered I could already smell the nice calming smell of the aroma oils. I handed our vouchers to the receptionist and was told we’re late (Sorry!). I thought we wouldn’t get our massage because we were late, but we were still accepted and were ushered inside to where the comfortable sofa seats where. We then got our feet soaked in a wooden tub filled with hot but tolerable water with soap. I like getting hot foot soaks before a massage. It warms up the body even if the place is cold with the AC. The therapists then dried our feet and gave us a pair of slippers each. They took our shoes and asked us to enter the couple’s room. The private room had seperate elevated beds, had a small storage table on each side where we can put our stuff and clothes, and had metal bars on the ceiling on top of each bed. I am familiar with the metal bars since I used to see those in the spas I used to frequent in Shanghai. They are used by therapists for handle support when they step on the backs of the guests during a massage. We call that type of massage in Filipino “marcha”. I know how to do it too since I used to do it for my dad when I was young. We then took off our clothes and wore the boxer shorts offered and lied down on the bed. The therapists entered and started their massage. Oohh it was very good! I fell asleep right around before my session ended. Rich also enjoyed his massage. Whew, finally! After the massage, they offered us hot tea and also wiped our arms, feet and back with hot wet towels. I liked that they do that too. They left tip envelopes with their names, and I made sure to save both their names in my phonebook. After fixing ourselves and when we were back in the reception area, the receptionist asked us if we enjoyed our session. Oh yes, we did! 🙂

I asked what kind of massage did they give us and checked the regular price for 60 minutes. It was P480 for a swedish massage, not too bad. Even if we can’t get another voucher, I’m sure we will back to have another session. Thank you, Shine Spa!